SIMULATION
Please wait while the virtual machine loads. Once loaded, you may proceed to the lab section. This may take a few minutes, and the wait time will not be deducted from your overall test time.
When the Next button is available, click it to access the lab section. In this section, you will perform a set of tasks in a live environment. While most functionality will be available to you as it would be in a live environment, some functionality (e.g, copy and paste, ability to navigate to external websites) will not be possible by design.
Scoring is based on the outcome of performing the tasks stated in the lab. In other words, it doesn’t matter how you accomplish the task, if you successfully perform it, you will earn credit for that task.
Labs are not timed separately, and this exam may have more than one lab that you must complete. You can use as much time as you would like to complete each lab. But, you should manage your time appropriately to ensure that you are able to complete the lab(s) and all other sections of the exam in the time provided.
Please note that once you submit your work by clicking the Next button within a lab, you will NOT be able to return to the lab.
You may now click next to proceed to the lab.
You plan to move backup files and documents from an on-premises Windows file server to Azure Storage. The backup files will be stored as blobs.
You need to create a storage account named corpdata9172795n2.
The solution must meet the following requirements:
– Ensure that the documents are accessible via drive mappings from Azure virtual machines that run Windows Server 2016.
– Provide the highest possible redundancy for the documents.
– Minimize storage access costs.
What should you do from the Azure portal?
Answer: Step 1: In the Azure portal, click All services. In the list of resources, type Storage Accounts. As you begin typing, the list filters based on your input. Select Storage Accounts.
Step 2: On the Storage Accounts window that appears, choose Add.
Step 3: Select the subscription in which to create the storage account.
Step 4: Under the Resource group field, select Create New. Create a new Resource
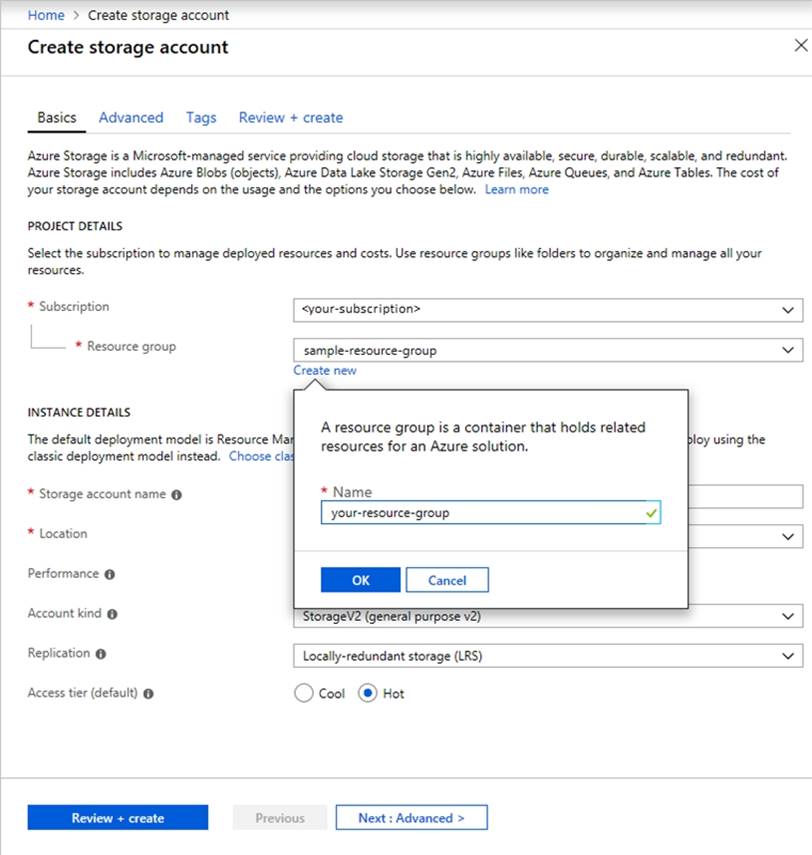
Step 5: Enter a name for your storage account: corpdata9172795n2
Step 6: For Account kind select: General-purpose v2 accounts (recommended for most scenarios) General-purpose v2 accounts is recommended for most scenarios. General-purpose v2 accounts deliver the lowest per-gigabyte capacity prices for Azure Storage, as well as industry-competitive transaction prices.
Step 7: For replication select: Read-access geo-redundant storage (RA-GRS)
Read-access geo-redundant storage (RA-GRS) maximizes availability for your storage account. RA-GRS provides read-only access to the data in the secondary location, in addition to geo-replication across two regions.
References:
https://docs.microsoft.com/en-us/azure/storage/common/storage-quickstart-create-account
https://docs.microsoft.com/en-us/azure/storage/common/storage-account-overview
Latest AZ-103 Dumps Valid Version with 369 Q&As
Latest And Valid Q&A | Instant Download | Once Fail, Full Refund
