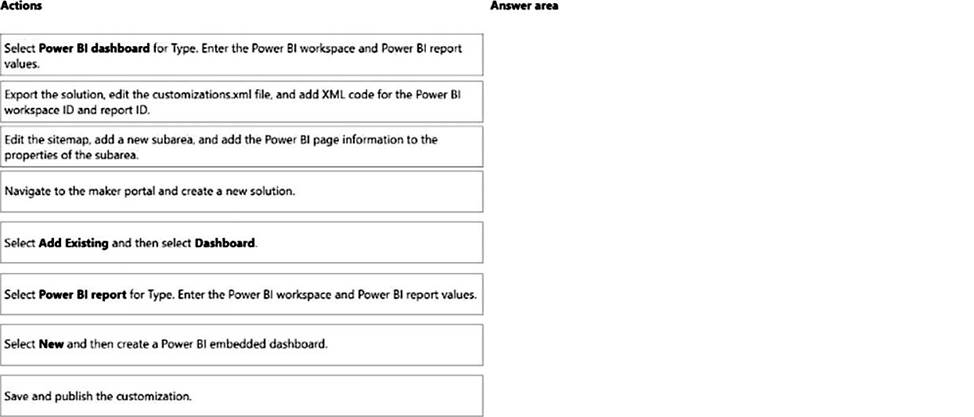
DRAG DROP
A company creates a single-page Power BI visualization to show how a Power Virtual Agents chatbot is performing.
Users must be able to navigate to the charts from anywhere within the Customer Service workspace.
You need to add the Power BI information to the Customer Service workspace app.
Which five actions should you perform in sequence? To answer, move the appropriate actions from the list of actions to the answer area and arrange them in the correct order.
Answer: 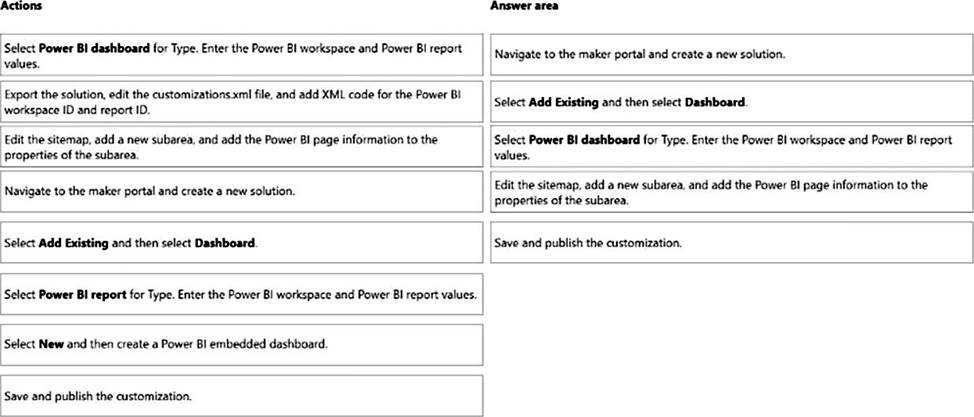
Explanation:
Table
Description automatically generated
Step 1: Navigate to the maker portal and create a new solution.
Step 2: Select Add Existing and then select Dasbhoard.
Step 3: Select Power BI Report for type. Enter the Power BI workspace and Power BI report values.
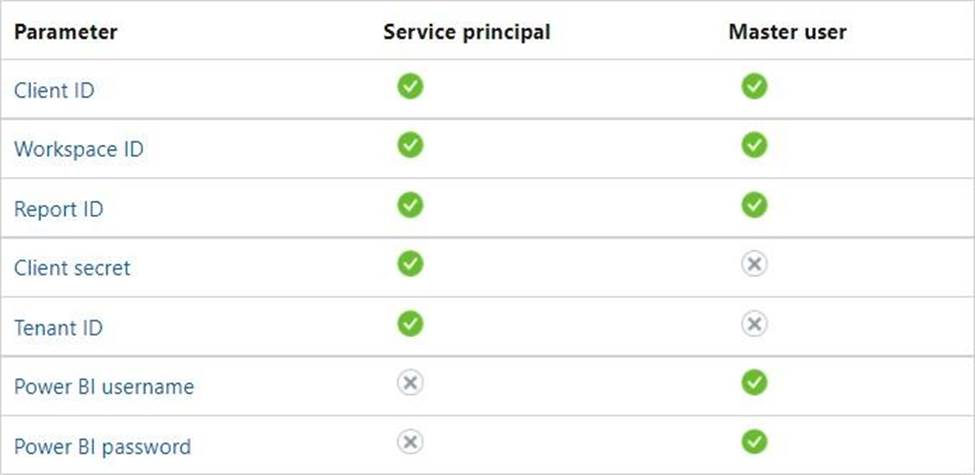
Note: Get the embedding parameter values
To embed your content, you need to obtain certain parameter values. The table below shows the required values, and indicates if they’re applicable to the service principal authentication method, the master user authentication method, or both.
Before you embed your content, make sure you have all the values listed below. Some of the values will differ, depending on the authentication method you’re using.
Table
Description automatically generated
Step 4: Edit the sitemap, add a new subarea, and add the Power BI page information to the properties of the subarea
Edit the default site map
Your environment comes with a default site map. This site map is supported for both custom business apps and Dynamics 365 for Outlook.
✑ In the Dynamics 365 – custom app, go to Settings > Customizations.
✑ Select Customize the System.
✑ In the solution window, under Components, select Client Extensions.
✑ Double-click to select the site map that has the display name Site Map and is in a Managed state. You can also select the site map, and then on the toolbar, select Edit.
✑ The site map opens in the site map designer.
✑ Add an area to the site map.
✑ Add a group to the site map.
✑ Add a subarea to a group in the site map.
✑ Select Save.
✑ Select Publish.
Step 5: Save and publish the customization
Latest MB-230 Practice Questions with 105 Q&As
Updated Study Material | Instant Download | Detailed Answers and Explanations