DRAG DROP
You plan to deploy Windows Virtual Desktop.
You need to create Azure NetApp Files storage to store FSLogix profile containers.
Which four actions should you perform in sequence after you register the NetApp Resource Provider? To answer, move the appropriate actions from the list of actions to the answer area and arrange them in the correct order. NOTE: More than one order of answer choices is correct. You will receive credit for any of the correct orders you select.
Answer: 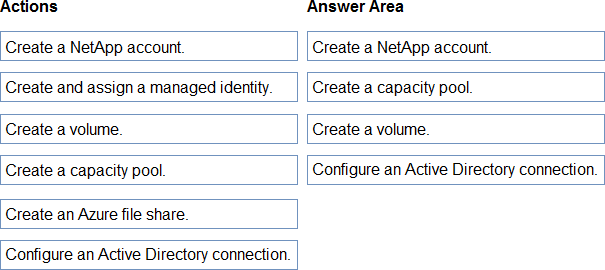
Explanation:
To set up Azure NetApp Files storage for FSLogix profile containers in Windows Virtual Desktop, you typically follow these steps:
Create a NetApp account.
Create a capacity pool.
Create a volume within the capacity pool.
Configure an Active Directory connection for the volume if necessary (this is only required if you are going to use SMB and need Kerberos for authentication).
A managed identity is not typically required specifically for the NetApp Files setup, and creating an Azure file share is not related to Azure NetApp Files ― this is a separate service within Azure storage options.
Here’s the sequence of actions in order:
Create a NetApp account.
Create a capacity pool.
Create a volume.
Configure an Active Directory connection. (This is assuming that FSLogix requires SMB access which would require AD authentication; if NFS is used instead, this step might not be necessary).
Azure NetApp Files requires these steps to set up a new environment, particularly when you are dealing with file shares that will be accessed by multiple users and devices, as is the case with FSLogix profile containers.
Latest AZ-140 Dumps Valid Version with 53 Q&As
Latest And Valid Q&A | Instant Download | Once Fail, Full Refund
