As a member of the virtual infrastructure team, you have been tasked with creating a new guest customization specification and deploying a test virtual machine from an existing legacy template migrated from an old VMware VI3 environment
To complete this task:
Deploy a new virtual machine with the name VM-GuestCust to esxi02a.vclass.local in cluster PROD-A
using the following details:
vCenter Server: vcsa01a.vdass.local
Datastore: ProdDS01
Template; Core-Template
The virtual machine requires an additional network card with the type VMXNET3.
Create a new Guest Customization Spec with the name Custom-Spec using the following details:
© Cust-Spec
Operating System: Windows Server 2008 R2
Registration Spec;
Name: vclass
Organization: VMware
The computer name must use the virtual machine name . Timezone must be set to America/Central Time
Network Specifications:
IPv4 and IPv6 are set to DHCP but require a static DNS entry of 172.20.10.10
The computer must join the domain vclass.local using the following credentials:
Username: administrator
Password: VMware1!
Answer: Select Menu > Policies and Profiles, and under Policies and Profiles, click VM Customization Specifications.
Click the Create a new specification icon.
The New VM Guest Customization Specification wizard opens.
On the Name and target OS page, enter a name and description for the customization specification and select Windows as a target guest OS.
(Optional) Select the Generate a new security identity (SID) option and click Next.
A Windows Security ID (SID) is used in some Windows operating systems to uniquely identify systems and users. If you do not select this option, the new virtual machine has the same SID as the virtual machine or template from which it was cloned or deployed.
Duplicate SIDs do not cause problems when the computers are part of a domain and only domain user accounts are used. However, if the computers are part of a Workgroup or local user accounts are used, duplicate SIDs can compromise file access controls. For more information, see the documentation for your Microsoft Windows operating system.
On the Set Registration Information page, enter the virtual machine owner’s name and organization and click Next.
On the Computer name page, enter a computer name for the guest operating system and a domain name.
The operating system uses the computer name to identify itself on the network. On Linux systems, it is called the host name.

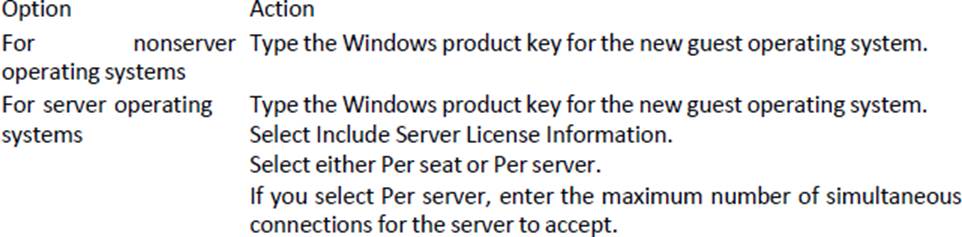
On the Windows license page, provide licensing information for the Windows operating system and click Next.
On the Set Administrator Password page, configure the administrator password for the virtual machine and click Next.
Enter a password for the administrator account and confirm the password by typing it again. (Optional) Select the Automatically logon as Administrator check box to log users in to the guest operating system as Administrator, and select the number of times to log in automatically. On the Time zone page, select the time zone for the virtual machine and click Next.
(Optional) On the Run Once page, specify commands to run the first time a user logs in to the guest operating system and click Next.
See the Microsoft Sysprep documentation for information about RunOnce commands.
On the Network page, select the type of network settings to apply to the guest operating system and click Next.
Select Use standard network settings so that vCenter Server configures all network interfaces from a DHCP server by using the default settings.
Select Manually select custom settings and configure each network interface yourself.
Select a network adapter from the list or add a new one.
For the selected NIC, click the vertical ellipsis icon and select Edit.
The Edit Network dialog box opens.
Click the IPv4 tab to configure the virtual machine to use IPv4 network.
You can configure all the settings at that stage or you can select the Prompt the user for an IPv4 address when the specification is used option. In that case, vCenter Server prompts for an IP address when you select to apply that customization specification during cloning or deployment. With that option, you can also configure the gateways during cloning or deployment. Click the IPv6 tab to configure the virtual machine to use IPv6 network.
You can configure all the settings at that stage or you can select the Prompt the user for an address when the specification is used option. In that case, vCenter Server prompts for an IP address when you select to apply that customization specification during cloning or deployment. With that option, you can also configure the gateways during cloning or deployment.
Option Workgroup Windows Domain
Click the DNS tab to specify DNS server details.
Click WINS to specify primary and secondary WINS server information.
Click OK to close the Edit Network dialog box.
On the Set Workgroup or Domain page, select how the virtual machine participates in the network and click Next.

On the Ready to complete page, review the details and click Finish to save your changes.
Latest 3V0-22.21N Dumps Valid Version with 17 Q&As
Latest And Valid Q&A | Instant Download | Once Fail, Full Refund
