

A company calculates the benefit of a request based on the answers to 4 questions on a request custom form, this benefit value Is used to approve the request The values can be 0 through 15.
Projects are then char ted in benefit groups as follows: Level 1:0
Level 2: 1 – 5
Level 3: 6 10
Level 4 11-15
- A . In addition to the calculated value on the request, what other calculation should be created to achieve this reporting
- B . Use a value expression on the view to link to the source request object
- C . Use a calculated expression on the protect custom field to calculate the benefit value
- D . Use text mode on the grouping with an aggregator formula to link to the project form
B
Explanation:
In this scenario, the company is looking to group projects based on a benefit calculation from a custom form. The most efficient way to achieve this grouping and reporting structure in Adobe Workfront is by creating a value expression on the view. This method allows you to dynamically link the benefit value from the request object to other reporting structures, including the project object. Value Expression on View: The value expression acts as a direct link between the custom form’s calculated field and the reporting or view settings, enabling the system to pull the benefit value dynamically from the request.
Request Object Linking: By linking to the source request object through the value expression, it allows for seamless integration of calculated values into the project reporting view, ensuring that the benefit groups (Level 1-4) can be reported accurately based on the defined thresholds (0, 1-5, 6-10, 11-15).
This approach is more efficient compared to creating multiple calculated fields across different objects, and it allows for better maintainability and adaptability in future changes.
References from Adobe Workfront documentation emphasize the use of value expressions in reports and views for linking and utilizing calculated fields across different objects, enhancing the flexibility and power of custom reporting capabilities. Text mode is not necessary here because it is primarily used for custom formatting or more advanced use cases that don’t involve simple value transfers between objects.
For more detailed information, you can refer to the official Workfront Help documentation on Custom Forms and Advanced Reporting Techniques in Adobe Workfront, where calculated fields and value expressions are thoroughly covered.
An organization uses a dropdown custom field for the type of creative assets that their internal studio produces. The studio managers use a report grouped by type of asset to determine which assets have been produced by the studio. A decision has been made to concentrate purely on digital work.
Which action will prevent the print media options from being selected, while allowing historical data to display on the report?
- A . Hide the print choices on the dropdown field
- B . Remove the print choices on the dropdown field
- C . Move the print choices to the end of the dropdown list
A
Explanation:
In this case, the organization wants to prevent users from selecting print media options for new entries while still displaying historical data in reports. The best way to achieve this is to hide the print choices in the dropdown field. This approach ensures that:
Historical data remains unaffected: Since you are only hiding the options and not removing them, existing records with those print media values will continue to display in reports and other views. No selection of new print options: By hiding these options, users will no longer be able to select them for new records, effectively preventing any further print media classifications.
Removing the print options (Option B) would delete historical data associated with them, which is not desirable for reporting. Moving them to the end of the list (Option C) doesn’t restrict users from selecting them, which does not meet the objective of focusing solely on digital work.
This practice aligns with Adobe Workfront’s best practices for managing dropdown fields, where options can be hidden but not removed, thus preserving the integrity of historical data while controlling future input.
For more details, refer to the Custom Fields section in Workfront’s documentation, specifically around managing dropdown options and preserving historical data visibility in reports.
A custom field must be created to represent the Creative Manager and allow the selection of an existing resource name in the Workfront application.
Which type of field and object type should be selected?
- A . Field type Typeahead
Object type User - B . Field type – Calculated Field
Object type -Manager - C . Field Type – Checkboxes
Object type- User
A
Explanation:
The requirement is to allow users to select a resource (Creative Manager) from a list of existing users in the Workfront application. The appropriate solution is to use a Typeahead field with the User object type.
Field type – Typeahead: This field allows users to start typing the name of an individual, and the system will auto-suggest matching users from the Workfront database. This is ideal for scenarios where you need to assign a specific role, like a Creative Manager, from a list of existing users.
Object type – User: By using the User object type, the field will link directly to Workfront’s user directory, ensuring that the selection is limited to valid, active resources in the system.
This combination of field and object type is the most efficient for assigning roles based on existing users, as it prevents errors and ensures data consistency by utilizing Workfront’s internal user directory.
Options B and C are not suitable because a calculated field is not required, and checkboxes do not allow selection from a list of user names.
For further reference, consult the Custom Fields and Typeahead Fields sections in Workfront’s documentation, which outline how to configure these fields to enable user selection from the organization’s resource pool.
A custom field needs to be mapped in AEM metadata mapping the field details are below:
Label – Creative Manager
Name – managerCreative Description
The resource assigned the creative manager role
How is the field from Workfront referenced in AEM?
- A . CUSTOM FORMS Creative Manager
- B . managerCreative
- C . CUSTOM FORMS: managerCreative
C
Explanation:
In Adobe Experience Manager (AEM), when mapping metadata fields from Workfront, custom form fields are referenced using the CUSTOM FORMS prefix followed by the internal name of the field. In this case:
The Label is "Creative Manager"
The Name is "managerCreative," which is the internal field name in Workfront.
To reference this field in AEM metadata, you need to use the CUSTOM FORMS: prefix followed by the
field’s name, making the correct reference CUSTOM FORMS: managerCreative. This ensures that AEM can correctly pull the metadata value from Workfront when syncing or using the Workfront enhanced connector for AEM.
Options A and B are incorrect because they either lack the proper formatting or are incomplete. For more details on this configuration, you can refer to Adobe Workfront’s enhanced connector documentation for AEM, particularly around metadata mapping and field referencing practices.
A company has a workflow where multiple people ate downloading and working on the same document simultaneously, which causes duplication of efforts. The company wants to use a document feature that will stop others from downloading the document when others are working on It.
Which document feature should De used?
- A . Go into the document details page and dick Check out
- B . Change the document status to Unavailable
- C . Post an update stating mat an employee is editing the document
A
Explanation:
Workfront includes a document checkout feature that allows users to lock a document when it is being edited, preventing others from downloading or editing the file simultaneously. This feature effectively stops duplication of effort and ensures that only one person can work on a document at a time.
Document Checkout: By navigating to the document details page and clicking "Check out," the document will be locked for editing by the person who checked it out. Other users will be notified that the document is being edited, and they will not be able to download or make changes until it is checked back in.
Option B is incorrect because changing the document status to "Unavailable" does not prevent downloading or editing. Option C, while helpful for communication, does not enforce restrictions, which could still lead to duplication of effort.
For more detailed information, refer to the Document Collaboration and Management section in the Adobe Workfront documentation, which outlines how the check-in/check-out system works.
Metadata mappings between Adobe Workfront and the AEM have been configured A user wants to send a document and its metadata from Adobe Workfront to Adobe Experience Manager Assets.
How should the user accomplish this?
- A . Select the document in Workfront click Send to. choose the experience Manager integration, choose the metadata to synch
- B . Select the document in Workfront. click Send to, choose the Experience Manager integration, and metadata will synch automatically
- C . Select the document in workfront. choose New Version, choose the experience Manager integration, choose the metadata to synch
B
Explanation:
When metadata mappings between Adobe Workfront and AEM are configured, the process of sending a document along with its metadata from Workfront to Adobe Experience Manager (AEM) Assets is streamlined. The user selects the document in Workfront, clicks "Send to," and chooses the Experience Manager integration.
The metadata fields that have been mapped are automatically synchronized along with the document. There is no need for manual selection of metadata at this stage, as the integration ensures that all configured mappings are applied.
This functionality is part of the enhanced connector, which simplifies the workflow between Workfront and AEM Assets by automating the synchronization of mapped metadata fields during the document transfer.
For more details, refer to Adobe’s documentation on Workfront for Experience Manager Enhanced Connector, which outlines how automatic metadata synchronization works during document transfers.
A user wants to send a new version of a document they have uploaded to Workfront (o make sure that this latest version is now available in Adobe Experience Manager Assets. This document has previously been uploaded into both Workfront and the AEM.
How should the user accomplish this?
- A . Select the document in Workfront rename to include the version number. click Send to. choose the experience Manager integration
- B . Select the document in Workfront. select New Version, choose the Experience Manager integration, upload the revised version
- C . Select the document in workfront. make sure it has the same name as the previous version, click Send to. Choose. The experience Manager integration
B
Explanation:
To upload a new version of a document and ensure it is available in AEM Assets, the user must select the New Version option in Workfront. This triggers the version control process where the updated file can be uploaded.
By choosing the Experience Manager integration after selecting New Version, the system ensures that the latest version of the document is sent to AEM Assets, where it will replace the previous version without losing version history.
This workflow supports maintaining version control between Workfront and AEM, ensuring that the most current version of the asset is always available in both systems.
Refer to the Workfront-AEM Enhanced Connector Guide for further details on version control and document updates between Workfront and AEM.
A marketing campaign is being managed in Adobe Workfront As part of this, a user wants to utilize an asset that was created for a previous campaign. This asset exists within Experience Manager Assets. The Workfront for Experience Manager Enhanced Connector has been configured and installed.
How should the user accomplish this?
- A . Download the asset from the ACM. go to the Documents area on the Workfront project, click Add new. select the required asset
- B . Go to the Documents area on the Workfront project, click Add new, choose the Experience Manager integration, select the required asset
- C . Go to the Documents area on the Workfront protect click New version, choose the experience Manager integration, select the required asset
B
Explanation:
In this scenario, the user is managing a marketing campaign in Workfront and wants to use an existing asset from AEM Assets. Since the enhanced connector is already installed and configured, the user can go to the Documents area within the Workfront project, click Add new, and then select the Experience Manager integration.
This integration allows the user to browse assets stored in AEM and select the required asset, which will be linked to the Workfront project without the need to download and re-upload the file.
This seamless integration between Workfront and AEM Assets enhances workflow efficiency by enabling users to directly access and use assets from AEM within their Workfront environment. For more information, refer to the documentation on Workfront and AEM Asset Integration, which covers the process of selecting and using AEM-stored assets within Workfront.
A developer needs to deploy com myCompany.ui.content package to only AEM Cloud Service author environment.
Which option should the developer choose to meet the requirement?
A)
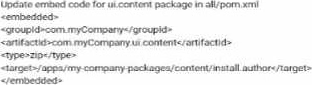

B)


C)
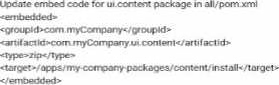

D)
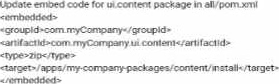

- A . Option A
- B . Option B
- C . Option C
- D . Option D
A
Explanation:
The requirement is to deploy the com.myCompany.ui.content package specifically to the AEM Cloud Service author environment. The key here is ensuring that the package is targeted correctly to the author instance, without affecting other environments.
Option A uses the following target:
<target>/apps/my-company-packages/content/install.author</target>
The use of install.author ensures that the package will only be installed on the author environment of AEM as a Cloud Service, meeting the developer’s requirement. This is a common approach in AEM Cloud Service projects, where you differentiate between environments using the appropriate subfolder (in this case, author).
Option B (author.install) and Option D are similar but incorrect because they are not standard for specifying the exact environment, while Option C (install/) is too generic and could apply to both author and publish environments.
Refer to the AEM Cloud Service documentation on deployment and package management for more details on targeting specific environments such as author during content deployment.
For a customer, the local deployment process needs to differ from Cloud Manager. A developer
wants to execute maven profile for the Cloud Manager deployment pipeline only.
Which configuration should the developer use?
A)


B)
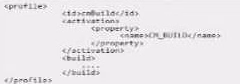

C)


- A . Option A
- B . Option B
- C . Option C
C
Explanation:
In the given scenario, the developer needs to execute a Maven profile specifically for the Cloud Manager deployment pipeline. This requires the use of a property that is exclusive to Cloud Manager, allowing the profile to activate only when the build is being executed in the Cloud Manager environment.
Option C uses the correct activation property:
<name>env.cloudmanager</name>
This property is specific to Adobe’s Cloud Manager environment, ensuring that this Maven profile will only be activated during Cloud Manager deployments. This allows the local deployment process to remain unaffected while the correct profile is triggered in Cloud Manager.
Options A and B use other properties (env.CM_BUILD or CM_BUILD) that are not standard or specific to the Cloud Manager environment, making them incorrect choices.
For more details, you can refer to Adobe’s Cloud Manager Maven Configuration documentation, which outlines how to configure Maven profiles specifically for Cloud Manager’s deployment pipelines.
A customer wants to support translations on AEM Cloud Service environment. They have an existing third party vendor who will provide a pre-build package that must be deployed to AEM so it can be leveraged as port of the workflow process.
How should the developer deploy this third party library onto AEM Cloud Service?
- A . Store the package as part of the customer code repository under the <url>file;$(mnven.multiModuleProjectDirectory)/install</url> folder and deploy it using Cloud Manager.
- B . Get the third party library as AEM package form the translation vendor and directly install it to Production environment using CRX Package Manager.
- C . Host the package in a remote public or private repository (password protected) and reference it as part of pon.xml so it is included as part of Cloud Manager deployment
A
Explanation:
In Adobe Experience Manager (AEM) as a Cloud Service, deployments are handled through Cloud Manager, and all code, including third-party libraries, must be part of the versioned code repository. To deploy the third-party package provided by the vendor, it needs to be included as part of the AEM project’s codebase under the install folder within the repository:
The package should be stored in the <url>file;$(maven.multiModuleProjectDirectory)/install</url> directory.
Once stored, the deployment will be handled through Cloud Manager’s deployment pipeline. This ensures the third-party package is included in the standard deployment process and follows AEMaaCS’s immutable infrastructure model, which ensures that changes to environments are made only through deployments using Cloud Manager.
Option B is incorrect because installing a package directly to production via CRX Package Manager is not allowed in AEM as a Cloud Service. Option C would work for self-hosted AEM instances but not for AEMaaCS, where dependencies must be part of the Maven build.
For more information, refer to AEMaaCS deployment best practices and the Cloud Manager documentation.
A customer finds an Ul issue with component (/apps/<customer-project>/<component-name>) on AEM page It needs to be fixed urgently to avoid miscommunication. The developer has been asked to urgently make the change in AEM production.
How should the developer deploy the change to an AEM Cloud Service production environment?
- A . Fix the Ul issue as part of the customer code base and deploy the change to immutable repository using Cloud Manage’ pipeline
- B . Due to the urgency of the request. Make the Ul fix directly to the component on AEM Production using CRXOE and then make same change to customer code bate
- C . Fix the component on local AEM and create an AEM package for that specific component that can be deployed to Production using package Manager as a one-off urgent fix
A
Explanation:
In AEM Cloud Service, the correct approach to making changes, even urgent ones, is to update the codebase and deploy it through the Cloud Manager pipeline. This ensures that the change is part of the version-controlled, immutable repository and follows best practices for deployment.
Immutable infrastructure: AEMaaCS does not allow direct modifications to production environments (e.g., via CRXDE Lite). All changes must be deployed through Cloud Manager, ensuring consistency and traceability.
Making changes directly on production via CRXDE or deploying one-off fixes using the Package Manager (Options B and C) violates AEMaaCS’s immutable infrastructure principle and is not supported.
Refer to Adobe Cloud Manager’s documentation for best practices on deploying urgent fixes in AEM as a Cloud Service.
A request form has a calculated field Allowable Days that calculates the number of days between the request Entry Date and the custom field Required Delivery Date.
What must be set up on the corresponding Prefect custom form so the Required Delivery Dale and the original number of Allowable Days display on the project?
- A . Add both the Allowable Days and the Required Delivery Date fields as new text fields.
- B . Add both Allowable Days and Required Denver Dale as calculated fields referencing the request object.
- C . Add Allowable Days as a calculated field and add Required Delivery Dale as a text field.
C
Explanation:
In this scenario, the calculated field Allowable Days and the Required Delivery Date need to display on the project.
To achieve this:
Allowable Days: This is a calculated field, so it should be set up as a calculated field in the project custom form, which references the difference between the Request Entry Date and the Required Delivery Date.
Required Delivery Date: This is a static field and should be displayed as a text field to ensure that the original requested delivery date is retained.
Option B is incorrect because both fields do not need to be calculated. The Required Delivery Date is already a static value and doesn’t require calculation.
For more information, refer to the Workfront documentation on setting up calculated fields and text fields in custom forms.
A customer sets up a calculated field on a request form. A user manually converts the request to a project and selects a template from the available active templates.
How should the administrator configure the Project custom form to make sure the value is passed to the project on conversion?
- A . Add a new field with the same name but make it a text field.
- B . Add the same field will a different calculation
- C . Add the-same- field but leave the calculation blank
C
Explanation:
When converting a request to a project in Adobe Workfront, it’s important to ensure that custom fields and their values are correctly passed from the request form to the project form. To achieve this, you need to add the same custom field on the project form, but in this case, the calculation should be left blank because the calculated value from the request form will be passed over and does not need to be recalculated at the project level.
Same field: The field needs to be exactly the same (same internal name) so the data can flow between the request and the project during the conversion.
Blank calculation: By leaving the calculation blank, you ensure that the field will accept the value from the request without overriding it or attempting to recalculate it.
For more details on setting up custom forms in Workfront and handling calculated fields during request-to-project conversions, refer to the Adobe Workfront Form Customization Guide.
A developer writes the following code to programmatically copy an existing asset to another folder in the DAM:
![]()

After executing this code. The developer receives the following exception:javax.jcr.
PathNotFoundException
What caused this issue?
- A . The asset in /content /dam/projectA/asset.jpg does not exist
- B . The path /content/dam/project does not exist
- C . The user lacks READ permission lo the asset in /content/dam/projectA
A
Explanation:
The javax.jcr.PathNotFoundException in this case indicates that the path to the asset /content/dam/projectA/asset.jpg cannot be found. The most likely cause is that the asset does not exist at the specified location, and thus the AssetManager is unable to copy it. PathNotFoundException: This exception is thrown when the repository path (in this case, the asset path) is not found in the JCR repository, meaning that the asset does not exist or the path is incorrect. Other possibilities like permissions issues (Option C) would typically result in a PermissionDeniedException, and Option B is incorrect because the issue specifically pertains to the asset path, not the parent folder.
To resolve this, the developer should check if the asset exists at the specified path or if the path is misspelled. For more information, refer to the AEM documentation on handling assets and JCR path exceptions.
A developer implements a custom workflow process using the following code:
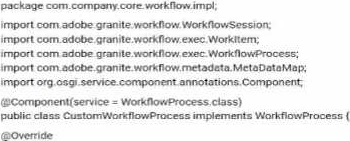

The code bundle has been deployed to AEM and displays as active in the Web Console. The developer has created a new workflow model, added a process step, and wants to configure that step to use the custom workflow process. However, the custom workflow process does not appear in the dropdown menu.
What should be done to resolve this issue?
- A . Add the process. label property to the @Component annotation in the CustomizationflowProcess class
- B . Add the process. title property to the @Component annotation in the CustomizationflowProcess class
- C . Add the process. name property to the @Component annotation in the CustomizationflowProcess class
C
Explanation:
In AEM, for a custom workflow process to be available for selection in the dropdown menu of a process step, the process.name property must be set in the @Component annotation. This property defines the unique name under which the custom workflow process will be registered and visible in the workflow model editor.
Here is an example of how this should be added to the existing code:
@Component(service = WorkflowProcess.class,
property = {"process.label=Custom Workflow Process", "process.name=customWorkflowProcess"})
process.label: This is the label that appears in the workflow model editor dropdown.
process.name: This is the internal identifier used by AEM to register the workflow process.
Options A and B would define other properties but will not resolve the issue of the custom workflow not appearing in the dropdown. The key property needed here is process.name.
For more details, refer to the AEM documentation on creating custom workflows and annotating components.
A project manager wants to ensure that all documents within a certain project are shared with a designated team in Workfront.
What is the correct option for carrying out this action?
- A . Link all the necessary document from Experience Manager to the designated project
- B . Find the project where these document all reside and share it with the entire team
- C . Share one of the documents the others will inherit the same access levels
B
Explanation:
In Workfront, the best way to ensure that all documents within a project are shared with a designated team is to share the entire project. By sharing the project, all documents and related assets within that project are automatically made available to the designated team members according to the project’s access permissions.
Option C is incorrect because sharing one document does not automatically inherit the same access levels for the other documents. Option A suggests linking documents from AEM, but the question pertains to sharing documents within Workfront itself.
Refer to Workfront’s documentation on document sharing for detailed instructions on how to share all project-related assets with teams.
An AEM server is overloaded with too many concurrently running workflows. The developer decides to reduce the number of concurrent workflows.
What should be configured?
- A . Maximum Parallel jobs in OSGI console
- B . Launchers for each workflow
- C . The number of threads in scheduler
A
Explanation:
In AEM, to limit the number of concurrent workflows running at the same time, you need to adjust the Maximum Parallel Jobs setting in the OSGI console. This setting controls how many workflow jobs can be processed simultaneously, and reducing this number will lower the load on the server by limiting the number of workflows that can run concurrently.
This setting can be found under the Day CQ Workflow – Workflow Engine configuration in the OSGI Web Console.
Options B and C refer to specific workflows and threads, but they do not directly address the overall system limit on concurrent workflow executions.
Refer to the AEM documentation on workflow scaling and performance for more information on how to adjust these settings in the OSGI configuration.
A company uploads several images that represent products Each product is associated with a unique SKU number. The product owner wants the ability to search for multiple products by SKU number.
Which two steps must be completed to do this? (Choose two.)
- A . Customize the Assets Admin Search rail to include a Single Property Predicate and configure the property name to the SKU number
- B . Customize the Assets Admin Search rail lo Include a Multi Value Properly Predicate and configure the property name to the SKU number
- C . Customize the mage metadata schema and add a new Single Line Text Held for the SKU number
- D . Customize the mage metadata schema and add a new Multi Value Text field for the SKU number
B, C
Explanation:
To enable the search of products by SKU number in AEM, two main configurations are required: Multi Value Property Predicate: By using a Multi Value Property Predicate, users can search for multiple SKU numbers at once. This is crucial if product owners need to query for multiple products simultaneously.
Single Line Text Field for SKU: SKU numbers are typically unique, so adding a Single Line Text field to the image metadata schema for SKU numbers ensures that each image has its own SKU field for accurate identification during searches.
Option D is incorrect because SKUs are usually single, unique identifiers, so a Multi Value Text field isn’t necessary for each SKU.
Refer to AEM’s documentation on customizing metadata schemas and Assets Admin Search to implement these features.
An AEM Author wants to search and filter through all assets in the DAM to find assets expiring within the next week.
What is the most efficient way of doing this?
- A . Configure the Assets Admin search rail to include the property Predicate and configure the property name to jcr:content/metadata/prism:expirationDate
- B . Configure the Assets admin Seach rall to include the Date Range Predicate and configure the property name to content to jcr:content/metadata/prism:expirationDate
- C . Configure the Assess Admin Search rail to include the Relative Date Predicate
C
Explanation:
To search for assets that are expiring within the next week, the most efficient way is to configure the search rail using the Relative Date Predicate. This predicate allows for dynamic filtering based on a relative date range, such as "next week."
The Relative Date Predicate automatically adjusts to search for assets within a specific upcoming time frame, such as the expiration date.
Option A and B are more rigid and require specific date or range configurations, which may not be as flexible or user-friendly as the relative date search.
Refer to AEM’s Assets Admin Search Rail configuration documentation for more information on predicates and their use in filtering search results.